
|
|
|
 |
HELLO, please be aware that I am in a hospital for evaluation for a couple of days...
as soon as I get back to the office the CDs will go out..
Thank you for understanding. |
|
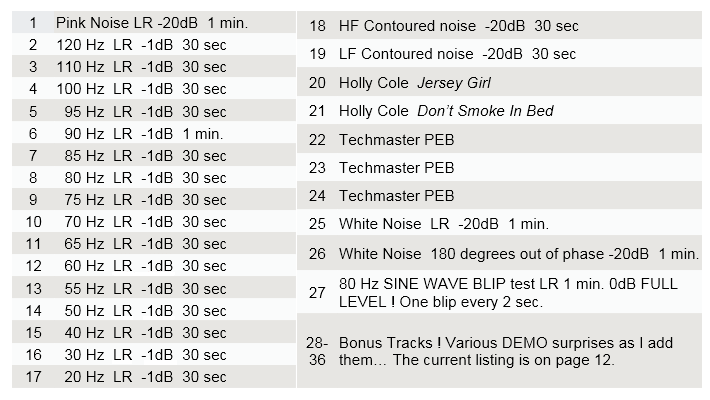
| Test / Setup CD Version 3 |
|
 |
But first... a tiny shameless plug...
Barry,
As per last weeks discussion regarding my experiences with your surround system calibration technique/subwoofer alignment:
First&a quotable:
&The results of the Soundoctor sound system calibration technique are nothing short of transcendental. In addition to jaw dropping improvements in sonic punch and visceral impact, phantom center coherency and soundstage imaging for frequencies well above the subwoofer crossover frequency are also vastly improved, even on real-world systems with non-optimal geometry or acoustic environments&
Im now on a quest to re-calibrate every system Ive ever installed using the Soundoctor method!
David Lloyd
Owner | Chief Technician
Mogul Media Systems LLC
|
|
This TEST CD is $18 USD and it comes with full printed instructions. This price INCLUDES shipping and handling, no matter where you are, worldwide. The CD will be sent 1st Class Mail. There's a CD order button at the bottom of the page.
Here's a clean PDF of the latest instructions: Soundoctor_Test_CD_v3.pdf
 13 pages, 320k 13 pages, 320k
The PDF has clickable links, and the WHITE NOISE section added.
|
|
These instructions have been greatly expanded for this latest version!
Thank you for ordering this TEST CD !
You are in for a unique audio experience. This CD represents more than 44 years research into the best methodology for the easiest and most comprehensive subwoofer integration and system alignment, including speaker imaging.
You will GET RESULTS where everything before has been disappointing or a failure. If you have been frustrated because you have a sub and "it never integrates properly" or "the bass is always muddy and/or boomy" then you have come to the right place.
This Version 3 has been redone in both track order and content from the earlier versions. These frequencies are all digitally generated in Wavelab and the CD is manually recorded (burned) individually, at a slow speed for the highest possible quality. This CD also has free bonus music partial sample tracks on it. There's also a new unique BLIP test, and dual white noise tracks, one "in" phase, one "out" of phase (polarity).
|
|
Check boxes  are included to assist you. are included to assist you.
The OVERALL setup procedure for any sound system is:
a) room acoustics
b) mains placement and alignment
c) Sub placement
e) Sub integration with a 2-channel system (if you have that)
f) Sub integration with Home Theater / Surround system (if you have that)
|
|
SUB PLACEMENT
You actually have 3 places to put a sub (or subs).
1) where you think it / they should go
2) where your spouse tells you to put them
3) where they ACTUALLY belong. 
Sub placement is FAR more critical than most people would like to believe. Even though the bass wavelengths are long, (an 80 Hz wave is 14 feet long) a ONE foot difference in sub placement might amaze you.
|
|
Please do not obsess about flat response in a living room. It is essentially not possible. You might find Ethan Winers page VERY entertaining. It's here: https://ethanwiner.com/audio_minutiae.htm Find the section where he says YOUR ROOM IS LYING TO YOU.
Here is an empirical test you can do which requires NO test equipment and it can be done at any time, whether or not your sub is in a good or bad position: Play ANY sine wave freq, (for example 70 Hz). Now walk completely across your room right in front of your chair from the left wall to the right wall. Notice all the peaks and dips (holes). Your room is a 5-dimensional grid. EVERY frequency has peaks and nulls at EVERY DIFFERENT SPOT in your room. Scary, isnt it?
And further, for an interesting discourse on sub placement (and many other acoustic phenomena) I also suggest reading Art Noxon's articles here: www.asc-home-theater.com/ht-articles.htm
You do not actually NEED any test equipment other than your ears to use this disc, although you may find an SPL meter or a frequency measuring device interesting. (If you have an RTA system hide it in a closet.) BECAUSE you have purchased a JL Audio Sub (or even another good brand of sub) the sub is simply powerful enough to cancel the bass in your room coming from your main speakers, leaving you with sound worse than when you started. You MUST carefully and correctly set up and integrate modern sub(s) to both the room (first) AND the rest of your system (second) in order to receive the results you paid for.
If you haven't done so, please read my "SUBS" white paper here: soundoctor.com/whitepapers/subs.htm
Room acoustics is the major part of the overall equation - perhaps 70%. SUB PLACEMENT is at least 20% of the rest of the equation, and everything else (that means ALL the gadgets you think you need) is 10% or less. IF you have the ability to place the sub(s) WHERE THEY BELONG, then you will do yourself a great disservice if you don't. If you purchase two subs and each is coupling only 3 dB less than it could, you are throwing away the equivalent of one entire sub.
There is one more phenomena which everyone ignores: REVERBERATION TIME. You CANNOT fix issues in the TIME (phase) domain with equalization. Further, with ANY room correction software (which is a lie; its NOT correcting your room, its messing with your speakers&) while you CAN assist in smoothing the frequency response by pulling DOWN a peak, you CANNOT fill in a hole: that hole in the frequency response is the physics of your room, caused by the reflections canceling each other out.
If these reflections continue for so long that the bass notes dont die away, and then the next note appears, then you will get muddy response or worse. The common knee jerk response is to add more subs in order to get more bass. This is exactly backwards. Lets say you are playing a dance CD with 120 BPM. Thats two bass (or kick drum) hits per second. If the reverberation time in your room is 1.5 (or more) seconds then the first note will not die away before the 2nd note shows up, and this will reverberate and repeat, and you will get mud.
With ANY assistive software, such as the JL Audio ARO or DARO or others, I SUGGEST learning everything NEUTRAL FIRST, and setting everything up according to these guidelines, THEN run ONE software at a time and discern if it helps or if you like it (or dont like it). DO NOT ASSUME that if you run all these computers in a row it will be either correct or you will like it. Flat response in a living room is NOT the holy grail of audio: impulse response is.
SO PLEASE, if possible, do the empirical tests. Even if you later put the sub where your spouse suggests, you will have first learned whats actually best. Some people call this the "crawl around" test. That's the next step.
|
|
THE CRAWL-AROUND TEST: Here is how you most EASILY move the sub: go to a hardware / home improvement store and get some Waxman Super Sliders. They come in multiple sizes AND versions for carpeted floors AND/OR hard floors. If you have a medium size sub such as a JL Audio e110, e112, f110, or f112 there is a version which STICKS on the bottom of the rubber foot of the sub. Larger versions simply sit on the floor and the sub rests on them. You can slide a JL f113 sub around a carpeted room easily with one finger. On carpets the larger ones will slide easier.
|
Track 24 is very helpful for the "crawl-around" test because it covers many frequencies AND it is repetitive. Place one sub AT YOUR LISTENING POSITION, FACING FORWARD. Using the analog outputs of a CD player, plug them directly into the sub. Turn the sub's filters to off, and the e.l.f. trim to "0". Manually adjust the volume level of the sub to a good perceivable loud but comfortable level. Sit right in front of the sub and LEARN what it is capable of. Now walk and crawl around the perimeter of the room, and any place you think a sub could go, and listen for the various couplings of the sub. You should notice a few areas where the bass is thin and weak (the nulls) a couple of areas where the bass is boomy and the fundamentals are louder than the harmonics (often too close to a corner) and then a couple of spots (2 or 4 places) where the bass sounds GREAT! Those are the spot(s) to put the subs so they inverse couple the best to your listening chair. You can't fight with the laws of physics!
Some people say they are going to put a sub in the corner because there is room gain. WRONG! There is no GAIN ! There is no AMPLIFIER ! The corner simply has the most efficient coupling at all frequencies (because the 2 walls act like a huge horn) and everywhere else in the room has, in comparison, loss. Try not to put a sub in the middle of a wall or space.
Also I suggest never putting subs BEHIND your main speakers. The low frequencies will mechanically vibrate the mains causing frequency modulation (doppler modulation) of the higher frequencies coming out of the mains. This is exactly one of the types of distortion you are trying to eliminate by NOT putting bass frequencies in your mains in the first place.
THEN, if you have JL Audio subs, adjust the ARO for EACH sub relative to its position in the room, THEN adjust the phase relationship between the sub and its main channel using the method outlined below. However, as a suggestion, you might want to NOT USE any ARO or other computer setting (such as Audyssey, etc) until you LEARN the characteristics of your system at its neutral settings FIRST. Then you may wish to experiment by making ONE change at a time, or ONE computer "adjustment run" at a time. It is very difficult to determine a result if you change more than one thing at a time.
A note about the master/slave hookup for JL Audio subs: If your room is SYMMETRICAL, perhaps a 2-channel system, and the room is like a shoebox, and you can close the door, and you are sitting on the center line and your speakers and subs are placed symmetrically& then yes, you can get away with it. And it works very well. If your setup is anything OTHER than symmetrical, I highly suggest using each sub as a master and adjusting each ARO by itself (and each phase knob by itself, too). Why? If the room is NOT symmetrical then the low freq sound waves from each sub will have different multiple reflective pathlengths from each sub to you the listener (and the test microphone) and to the left wall to the test microphone, and to the right wall to the test microphone, and so on. Therefore the necessary EQ to assist in the flattening out of one sub CANNOT BE THE SAME as for the other sub. Therefore copying the EQ from one to the other will not work well.
There is one more subtle difference between so-called Home Theater/Surround setups and 2-channel - inasmuch as correct audio is correct audio no matter what the situation. In HT situations you are dealing with bass management and that signal contains all the bass below the crossover point (which you have selected) from all 5 (or more) channels AND the LFE channel IF IT EXISTS on the DVD or Blue Ray. (There is no LFE channel on a CD since its only 2 channels) LFE noises in movies (typically 20-80 Hz) have very little phase coherency with signals above 80 (what is being fed to your main speakers). The DESIRED results in a HT setup is to get those sci-fi noises of planets blowing up convincingly at your chair.
One other industry bit of confusion: the signal coming out of your Home Theater Receiver/Processor IS NOT LFE!!! It is MANAGED BASS! It is everything below a defined frequency from ALL the channels (L C R Ls Rs Lb Rb and more&), summed into mono, and added to the LFE channel from the DVD if it exists. (it does not exist on every DVD) You are NOT (nor should you) run your mains full range and attempt to send ONLY the "LFE signal" to your sub. This only works in large movie theaters because of their size; the walls are so far away that for all practical purposes there are no standing waves; exactly the opposite of a living room.
In 2-channel stereo, there is often a very tight relationship between the bass notes (coming out of the sub) and their harmonic structure (coming out of the mains). For example, a kick drum has a fundamental around 60 Hz; a subharmonic component an octave down (therefore around 30 Hz); and a series of both even and odd harmonics extending up to 8000 Hz. Your mechanism of hearing feels the fundamentals (which are coming from the sub) and localizes the harmonics (which are coming from your main speakers). All of this is MOST apparent in well recorded acoustic bass (perhaps jazz) and cello (perhaps classical) music. If the phase relationship of the sub(s) are set correctly, even if the subs are behind you in the room you will perceive the musician playing the bass to be in the front of the room where he/she belongs.
All modern, powered, sealed subs have an analog phenomena called group delay (in the digital world this is often referred to as latency) so to best integrate sub(s) you must fix that timing issue so the sub lines up in time with the mains at the crossover frequency area. Since you cannot remove this inherent delay in the sub you must add this delay to all the top channels. The PHASE knob on a modern sub ADDS MORE delay to the sub than its intrinsic approximately 10 msec.
|
|
IN A HOME THEATER SYSTEM you do this by manually setting the speaker distance settings in the setup menu. Since consumer equipment operates sort of backwards, when you increase the distance setting of the sub you are adding delay to all the other channels. (!) I suggest setting all the speaker distance settings THE SAME and to 7 feet; then add 12 feet to the SUB distance only (so the sub distance now = 19 feet). Now you have added a bit more than the correct amount of delay to the REST of the system (the L C R Ls Rs) so you can then properly use the PHASE KNOB on the sub to FINE TUNE the timing match. This will give you the best possible impulse response through the entire system; the imaging and focus should then should be uncanny, and the bass focused and as tight as possible. Again, if this is done correctly, even if the subs are behind you, you will NOT localize them; it will seem as if the bass is playing from the front of the room, where it belongs, and this is true even if the crossover frequency is as high as 120 Hz. Heres another audio non sequiter: people say that bass is non directional. This is completely wrong. Audio is more or less directional; the phrase should be bass is NON-LOCALIZABLE because the wavelengths are so much larger than your head and therefore there is no phase difference between your ears relative to the wavelength size. The higher you cross over, the more you MAY localize the bass IF the timing of the sub is so far off from the mains that it almost becomes a separate musical event in time. If the timing is correct you will feel the bass and localize on the harmonics.
IN A 2-CHANNEL SYSTEM you cannot usually add delay to the tops (mains) therefore the subs will always be 1 cycle (or 360 degrees) late at about 100 Hz. If you have a DUAL HT/2-channel system then set the distances for the HOME THEATER part as above and then both parts (HT and 2-channel) will essentially line up. The HT part will be exactly in-phase and the 2-channel part will most likely be 360 degrees late, but still apparently in-phase.
IF YOU HAVE BOTH SYSTEMS do the phase/level match for the 2-channel part FIRST. Now leave the level control on the sub WHERE IT IS, and when you do the HT part use the SUBWOOFER LEVEL control in your setup menu or on the remote to match. Then when you go back and forth between HT and 2-channel you (essentially) wont have to adjust anything!
DECIDING ON THE CROSSOVER FREQUENCY: I suggest never going below 80, even if you think your speakers go down to 40, or below. Even in a room where the existing "mains" have a pair of 12" drivers (each) you will get far better results if you correctly seal the ports and correctly cross them over at 80, (or higher) and of course you MUST match the phase and timing relationship so the whole transition between the sub and the mains will be valid. For Home Theater setups set the Mains=SMALL, Sub=YES, XOVER=80 Hz (or 90, or 95) and if you have a choice, 24dB/octave. Feed each sub with the same signal placing "Y" cords anywhere. For JL Audio subs, if the room is symmetrical and everything in it is placed symmetrically you may use the master/slave system, but it is far better (and yes, more work) to use each sub as a master and then adjust the phase of each to match with the main it is closest to carefully.
You may (hopefully) experiment with different crossover freqs. With MANY mains which have drivers smaller than 8 I suggest 90 or 95 Hz. You MUST always do the (next) phase step as the LAST adjustment. If you change the crossover freq to experiment you MUST do the phase test again by playing a sine wave at the crossover freq and following the steps below. One more time: The PHASE test MUST ALWAYS be last.
If you have a 2-channel only system if you do not correctly use a crossover you are both wasting your time and you will be frustrated. You simply CANNOT match a modern, sealed sub to an existing so-called full range, probably ported speaker system unless it is done CORRECTLY. You CANNOT just use the Low-Pass filter in the sub. It is NOT a crossover. But you be the judge. At least with this test CD you have a guide to work with. Please investigate the JL Audio CR1 crossover, here: www.jlaudio.com/collections/home-audio-subwoofer-crossovers/products/cr-1-home-audio-subwoofer-crossovers-96020
|
|
If your speakers are ported, you SHOULD close (seal) the ports. Towels will do for a test but you might consider purchasing a 3", 4", or 5" thick slab of "foam" at a notions / sewing store; then using a suitable circle template (food can, peanut butter jar, etc) mark the foam and cut with a bread knife slowly. Then spray paint with flat black barbecue paint and you will have a professional port seal. Some better brands of speakers (B&W for example) come with port plugs for just this purpose. What you are trying to accomplish is to NOT have multiple sources of differing phase relationships (the main driver, the port air, and the sub driver) at or near the crossover freq. The filter slope of both the sub and the mains should be a mirror image in both the frequency and phase domain, and there should only be two LF sources attempting to couple and cross over: the LF driver in your main speaker and the driver in the sub cabinet.
|
|
TRACK 8: 80 Hz, 2 min @ -1dBfs Using 80 Hz is an easy way to set the relative phase of the JL Audio and other modern subwoofers to match the "mains". If you are using a different XO frequency, use that frequency track, not 80!
|
| Next we set the phase ! |
|
Method A (easier, but less accurate) After you have placed the sub where you want it, put YOUR HEAD equidistant between the sub and the speaker it is CLOSEST TO (for example the LEFT FRONT). Disconnect the 'other' front speaker. Play the 80 Hz tone and adjust the PHASE CONTROL of the sub and the POLARITY SWITCH until the bass is loudest and cleanest - in other words, the peak.
|
|
Method B (FAR more accurate, and more work...) Invert the polarity of the MAIN speaker the sub is CLOSEST TO. Disconnect all the other speakers in the room. Place your head equidistant between the sub and the speaker it is closest to. Play the 80 Hz tone. Adjust the phase control AND the level control and both settings of the polarity switch until you hear a distinct NULL. (IT MIGHT EVEN DISAPPEAR COMPLETELY) There should be some setting of the two controls on the JL sub which will provide a rather sharp null - this is a CRITICAL setting and you might find it to be very sharp. Now put the wiring back the correct way to that one speaker. Reconnect the other speaker and you're done.
|
|
If you have 2 subs repeat either of the above procedures with the mains speaker the 2nd sub is closest to. All the sinewave tone tracks are recorded exactly the same on both channels therefore you can disconnect either L or R speaker for your convenience.
The REASON for Method B? When 2 waveforms are IN PHASE and they sum they may get 6dB louder, but when 2 signals are OUT OF PHASE and they sum, theoretically they cancel completely, therefore It is much easier to hear the NULL. In practice, LF signals coming from 2 spots in a room won't sum 6dB louder; they will sum perhaps 4 or 5 dB louder, because in a home size room the summation also includes the summation / cancellation of various standing waves and reflections; therefore the summation is uncorrelated.
|
|
By using the accurate phase test above you will AUTOMATICALLY have set both the PHASE (timing) and LEVEL, since it has to be both the same level and exactly out-of-phase to cancel. But remember when you are ALL done with this, inasmuch as your "system is calibrated, there is often a huge difference in the bass level and content between different sources. You may find that DVD's are more consistent and that music CD's are all over the map. You can then arbitrarily determine any reference point you like and work + or - from there; i.e. you might have to turn your subs UP 3dB to play rock CD's and DOWN 2 dB to play SCI-FI movies. It's up to you. Do not think because "it's calibrated" you are stuck with that setting.
|
| TRACK DESCRIPTIONS |
|
TRACK 1 : Pink Noise 2 minutes @ -20dBfs The L and R channels are IDENTICAL. Because the noise is at -20dB below full scale digital, it represents the same level as "THX" or "Dolby" "reference" level. That means that when your system volume is adjusted "normally" and this is what people typically call reference level (everyone in the consumer industry uses a different and arbitrary scale&) you should get 85dB SPL (slow weighted C of course...) at your sweet spot chair. Do not do this test before you do the phase adjustment!
This also means the CD is CAPABLE of 20dB MORE, which translates to 105dB SPL. You may use the pink noise for overall SPL measurement. Since the 2 tracks are identical (they are bit correlated) if you are playing one channel only and you turn on the 2nd channel the room level should (on paper) sum 6 dB. However, as mentioned above, because of phase anomalies and reflections in any given home-sized room, this almost never happens, but you can expect perhaps a 3, 4, or 5 dB increase.
|
|
TRACK 2 through TRACK 17: Tones (clean sinewaves) @ -1dBfs These tracks are all recorded 1dB below the MAXIMUM POSSIBLE ON THE CD. PLEASE BE VERY CAREFUL WHEN PLAYING THESE TRACKS. The highest frequencies are first. (120, then 110, then 100, then 95 etc.) Start with your system volume very low and move it upward until the desired result is obtained. The REASON these are recorded at this level is so you can determine if your subwoofer (or mains, or headphones, or entire system etc.) is CAPABLE of playing these frequencies and at these levels.
You can therefore determine the maximum possible output from your sub and your entire system and how it is coupling into your room at each given frequency. YOU are responsible for the careful and judicious use of these test tones. It is theoretically possible to damage your speakers, your amp(s) or your hearing with the careless use of these test tones or of the Techmaster PEB tracks below. Please be advised.
If, when playing individual bass tones (or the Techmaster PEB tracks, below) you find various objects, air conditioning grilles, drawer pulls, art objects, lamps, neighbors, etc. vibrating then I suggest you get some museum gel to stop their vibration. It's available here: www.detailsart.com/museumgel.aspx .
Tracks 18 and 19 offer a quick and dirty (but not fanatically accurate) method of getting the sub and the mains at the same level. You cannot use your SPL meter with the pink noise coming from your receiver. If you do the phase part above, YOU DO NOT NEED TO USE THESE 2 TRACKS. These were ORIGINALLY intended for when everyone was obsessed with Radio Shack SPL meters and in the olden days there was no phase control, only an incorrectly labelled phase switch (it isnt phase; its polarity&) on MOST brands of subs& and it was a quickie way to set LEVELS. Notice it has nothing to actually do with phase or timing - and there is the downside. You might think the levels are fine but you havent adjusted the phase correctly. Therefore the test is essentially a waste of time with more modern subs, but I have included it here anyway.
|
|
TRACK 18: HF PRE-CONTOURED Noise at -20dBfs This High Frequency noise is pre-contoured to be used with a Radio Shack or similar SPL meter when setting up a Home Theater receiver which HAS bass management. Adjust the volume control so this track is playing through the MAIN SPEAKER(S) at 85dBa (slow weighted C) at the listening position.
|
|
TRACK 19: LF PRE-CONTOURED Noise at -20dBfs This Low frequency noise is pre-contoured to be used with a Radio Shack or similar meter when setting up a Home Theater receiver which HAS bass management. Leave the volume where it was in the Track 17 test, above, and play this track. Adjust the SUBWOOFER level so the meter (set to SLOW WEIGHTED 'C') matches the 85dB as in the test above. By using these 2 tracks, it is not necessary to do any mathematical or mental conversions... just match the levels at the listening position. Since the SPL in the room is at 85dB, and the recording is at -20, that leaves 20 dB headroom for the Dolby / THX level of 105dB for peaks. Both of these tracks are only for an approximation and are NOT NECESSARY AT ALL if you use the sine wave method above, since it is FAR more accurate.
|
|
FREE BONUS TRACKS 20 and 21 - Holly Cole - Please purchase every Holly Cole CD you can find ! She deserves it and you will love it. While the recordings themselves are all superb, they are of a different enough flavor to keep you on your toes. The bass on Jersey Girl is a little bit heavy, perhaps 1-1/2 dB or so too much. If you carefully adjust your system then you should perceive this. If the bass seems WAY too heavy, or not heavy enough, then I will venture a guess that either or both the phase relationships and the levels of your subs are not set carefully enough.
Don't Smoke in Bed tests the limit of the plain ol' 16 bit process. Her voice should be FLAWLESS and yet the sibilants on many / some systems might sound flawed - yet the CD is actually clean and the waveforms are pristine. This is a fabulous test track to A-B different connections, i.e. compare the analog vs the coaxial digital, or RCA vs Balanced connections, vs whatever else your player has for outputs, and choose the cleanest. Her website is here: www.hollycole.com . While you're looking for Holly Cole recordings also try and find any of the now out of print Techmaster PEB CD's. You won't be sorry.
|
|
FREE BONUS TEST TRACKS 22, 23, 24 - Techmaster PEB Newtown Records and Techmaster PEB were at the heart of the Bass Revolution, which started in Florida in the early 90s (!!!). Their work remains at the top of every list: engineering, musicality, style, quality, production. Track 24 is the Ultimate Bass test. If your system cannot play this at 105 dB it is either set up incorrectly or you need JL Audio Subwoofers! (and you need them correctly set up&)You can damage ANY brand of sub or main speakers with these tracks if abused. Be careful!
Guess what: these tracks are from 1993 and are completely analog. And are still valid!
|
| TRACK 25: White Noise, LR 4 min @-20dBfs. Both channels are sample-accurate / identical. |
|
TRACK 26: White Noise, LR, 180 degrees Out of Phase, 4 min @-20dBfs. For use with HDMI connections, where you can't use "Y" cords, or if you CAN'T get at your actual speaker connections, or perhaps you have bi-wired mains and it's just way too much trouble to reverse the polarity of one Left or Right side.
To use these, see my WHITE NOISE test section, HERE: soundoctor.com/testcd/whitenoise.htm
|
TRACK 27: The BLIP test. This test is quite unique. It presents one BLIP every 2 seconds. That BLIP is 1/2 a cycle of an 80 Hz sinewave, only going in the positive direction, at 0dBFS. It has a duration of 6.5 msec. Therefore that waveform looks like this:
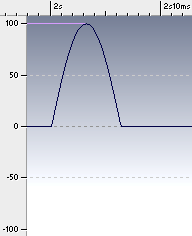 |
| Fig. 1 "BLIP" signal |
|
|
Notice the BLIP is POSITIVE-GOING (only) and the top of the sine wave is exactly at 100%, therefore this represents full possible level (modulation) on the TEST CD, i.e. 0dBfs. When you play this BLIP Test, the "end result" of the phase of your system, sometimes called absolute polarity, should make the Low Frequency cones move OUTWARD. This is also a fascinating, superb, and rather severe test to determine the delay time of the subwoofer relative to the rest of your system. As carefully outlined in my SUBS white paper, if your sub is 360 degrees (or even 720 degrees) late, you cannot measure it with a frequency-measuring device, and you will think the frequency response is flat but the impulse response will be smeared. That is the most important reason why measuring in the frequency domain is largely a waste of time, unless you FIRST fix the time domain.
Since this signal is at 80 Hz, and your crossover is set to 80 Hz, you should be able to hear this signal from either/both your mains and your sub(s). Therefore if you turn the volume down on the sub(s), you can use this test to determine absolute timing of other parts of the system. This will "rough in" speaker distance timing, and then you can use the WHITE NOISE test (below, and on the white noise page, here: soundoctor.com/testcd/whitenoise.htm), to really fine tune. Yes this blip test is a very obscure test.
Ideally, with this POSITIVE-GOING waveform, your low freq speaker cones and sub should move OUT of the cabinet towards you. This gives you the correct absolute polarity air pressure wave just as if it was coming from the front head of a kick drum, for example. Be aware that some / many records have gone through the entire recording / mixing / mastering process and have the WRONG polarity. Its interesting, but dont obsess about it too much& Do not be dismayed if you are totally confused by this track. Those of you enamored with audiophile headphones will find the comparison of this track on headphones vs speakers to be interesting.
FREE BONUS TRACKS 28 - 36 a surprise or multiple surprises each time. Fun bass, sample music, and dynamic snippets to show off your system. In many instances, there is PLENTY of dynamic separation - "AIR" - between everything so you can discern even separate drivers.
|
|
This TEST CD is $18 USD and it comes with full printed instructions. This price INCLUDES shipping and handling, no matter where you are, worldwide. The CD will be sent 1st Class Mail. Please click the button below to pay with PayPal.
|
|
GOOD NEWS! The new batch of CD's is in!
If you ordered one it is going out today 7/26/22
Barry
|
|
|
|
|
Thank you for your interest in this test CD !
If there's a space on the order page,
I'd love for you to tell me where you heard about the CD !
Thanks !
|
Please be aware of 5 things:
1) That because of the Covid situation, trips to the post office will be a little less frequent, and,
2) Because of the political post office mess, if you DON'T receive the CD in a timely manner (that means just a few days) please email me directly to let me know.
3) Your information will never be sold or shared - I only have your info for direct communication with you, such as email.
4) You can always email me directly for 1:1 assistance.

|
|
|
Yep - hot off the press... every CD is manually burned, one at a time.
|
|
|
|
| This page is soundoctor.com/testcd and was last updated on April 19, 2023 |
|